What Is Your EDC Knife, a Folder or a Fixed-Blade?

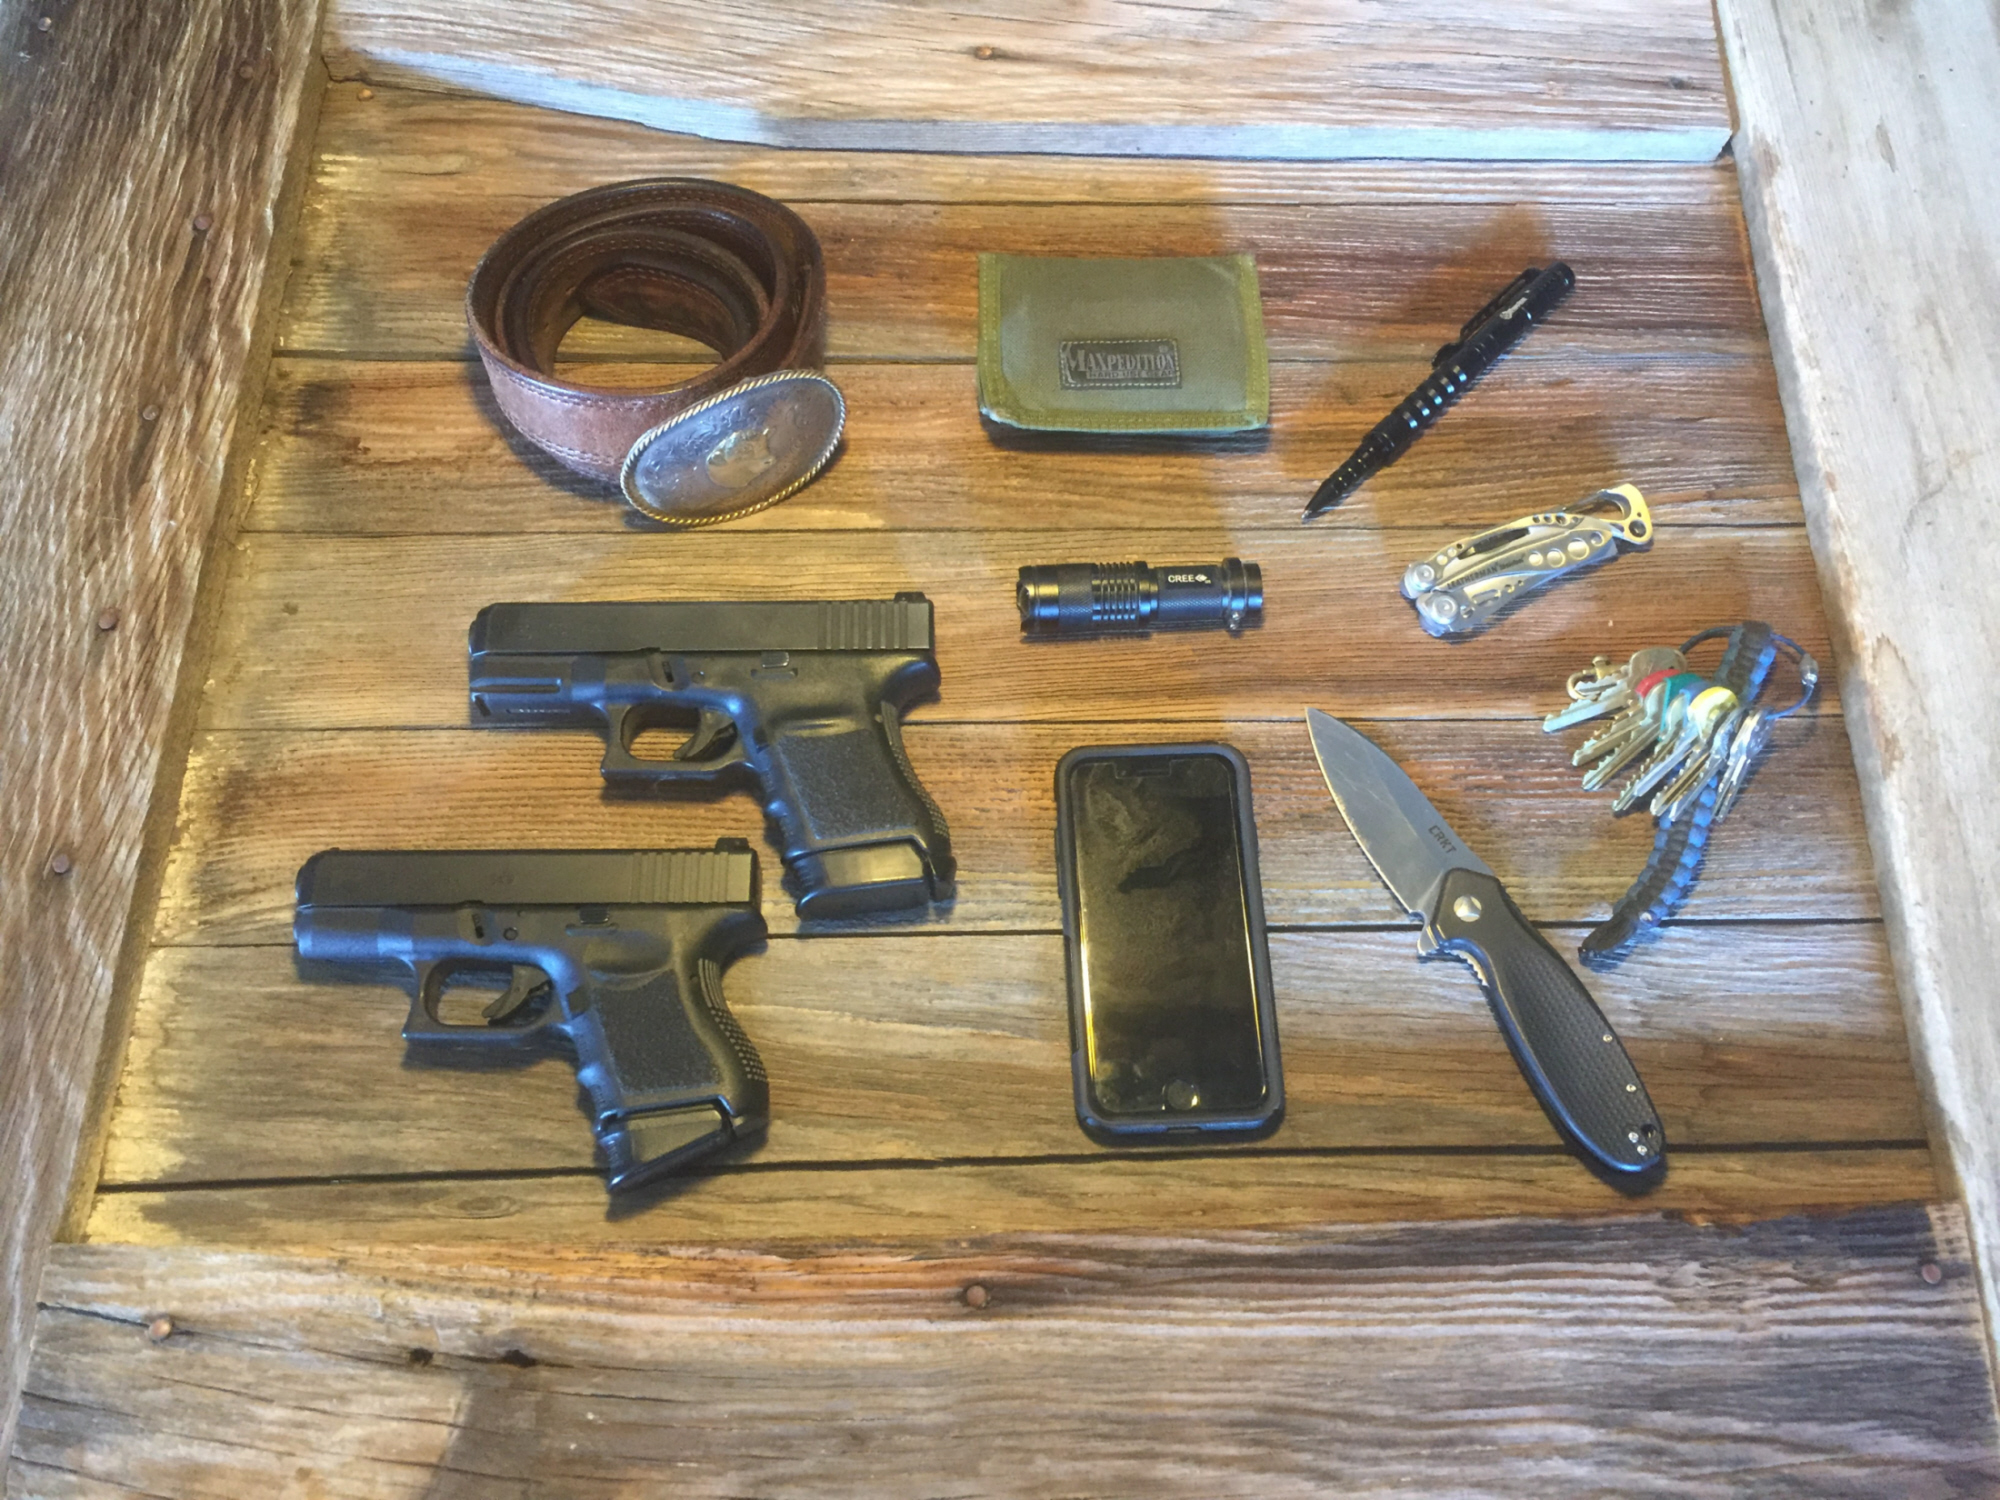
Choosing your EDC knife comes down to a personal choice.  Which one do you like best? Which one do you feel is more functional? Which one is cooler? What is the use for the knife?  And which one fits your lifestyle better? These questions are necessary to answer to figure out your choice.  
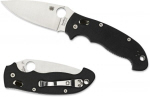
But everyone knows that we should all carry a folding knife, or should we?

Let’s Talk Knives

There are so many knives on the market today, and the price range is from inexpensive to mega bucks. When I was younger it used to be an easy choice when purchasing a knife, if you wanted a pocket knife there was one standard style, a small multi-blade knife that would fit in your pocket.  There were no belt clips, no belt holsters just a small knife.  Then if you wanted a fixed-blade knife you had to carry a large knife on your belt.  But those easy choices are over now, there are so many choices in todays knife market and your decision gets more and more difficult.

Uses Of A Knife

Is this going to be an Everyday Carry (EDC) knife or will it be for a specilized purpose?  If it will be used for opening boxes or packages, cutting string, twine, or rope, carving wood,  then I would consider it a EDC knife.  If you will be carving meat, personal protection, hunting or fishing, cutting seatbelts, breaking a window or other emergency uses, that would be a special knife.

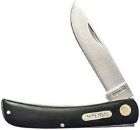
Folding Knife Advantages.

A folding knife seems to be the most popular knife 
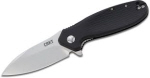
out there.  It is safe, easy to conceal, and can be in a small package and placed in your pocket.  For many years they have been known as pocket knives.  It is easy to get in and out of your pocket for daily tasks and does not usually get in the way. Some of the folding knives have a locking mechanism which keeps it open until you wish to close it.

Things To Think About When Using A Folder.

A folding knife is generally not as durable as a fixed blade knife.  Since the knife has a hinge, it can bend or break when you least expect it to. One thing to remember is that folding knives are harder to clean. and if used very aggressively can occationally break.

There are two types of locking mechanisms to consider: a “lockback” style folder is a very secure mechanism but does require two-handed closing.  The “liner lock” knife allows the user to close the knife with one hand.

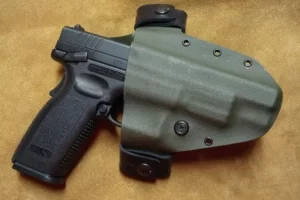
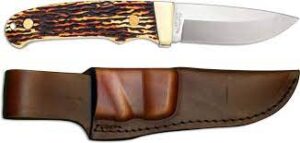
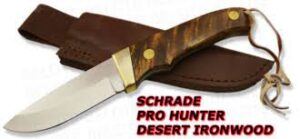
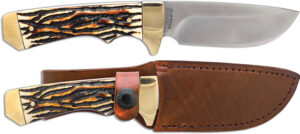
Fixed-blade Knife Advantages.

A fixed-blade knife 
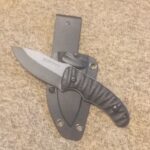
is much stronger and ridged since it is made out of a solid piece of steel, they can be used rougher and work stronger than a folder.  They are more durable and hold up to the elements well because they do not have a folding mechanism as with a folding knife.  A fixed-blade knife is easier to clean and maintain and can be deployed faster in a self defense situation.

Things to think about with a fixed-blade knife.

The biggest downside to a fixed blade knife is they are harder to conceal and not as convenient to carry. But with the right style of sheath they can work very well.

Final Comments.

After reading all of this information, the biggest choice comes down to you and what you like.  With all the various knive available on the market you can fine one that suites you and how you plan to use that knife.  The other good thing is that you do not have to only choose one knife, you can have as many styles of knives that you desire for whatever  activity that you are doing. Enjoy your knife hunting!

If you have any questions about this post or anything related to Everyday Carry (EDC)/Concealed Carry, feel free to leave a comment below and I will be happy to get back to you.

All the best,

Larry

Founder of Everyday Carry Essentials

    LEAVE A REPLY

    Your email address will not be published
    Required fields are indicated

    PEARCE GRIP EXTENSION FOR RUGER LCP MAX

    Product Review

    Great Additions to a Pocket Pistols Magazines.

    Product: Pierce Grip Extensions

    Price: $10.95 each

    Durability: High

    Best Place To Buy This Product: Optic Planet. com

    My Overall Rating: 9.50

    Quick Product Overview:

    The picture shown is a Ruger LCP Max with a Pearce Grip Extension installed.  This unit replaces the magazine base plate and retain all other factory components. It  does not alter the capacity of the magazine. These units will add 3/4″ additional length for better control and comfort.*** For use on the Ruger LCP Max magazines, must order a specific products for Ruger LCP 1 & LCP 2.

    Specifications Of This Product:

      • These units blend with the contours and texture of the handgun giving a factory appearance.
      • They are made from High Impact Polymer and withstand drop tests at temperatures from -20 F to 250 F.
      • They form the next logical finger positioning feature to provide control and comfort without sacrificing conceal ability.

    What I Like About This Product:

    As I really like the Ruger LCP Max for concealed carry, I dislike the fact that I can only get two fingers on the grip, and my pinkie finger is curled underneath the magazine. Once I tried these extensions on my magazines it made all the difference in the world. Better grip, and more control of my gun.

    What I Would Change About This Product:

    This product is very good and I would not change anything about this magazine extension.

    Final Remarks:

    One of the major things we need when we are shooting is a good grip on the handgun, without this our accuracy would be very poor. Using this Pearce Grip Extension helps us to attain a good grip on the handgun by adding a little more length to the magazine and therefore being able to stabilize the handgun better. Some of these extensions also add more capacity to the magazine and that is a good thing as well. For just a few extra dollars, these modifications are worth it.

    If you are interested in this product, click here.  Thanks for reading this product review.

    If you have any questions about this product review or anything else related to Everyday Carry (EDC)/Concealed Carry, feel free to leave a comment below and I will be happy to get back to you.

    Thanks,

    Larry

    Founder of Everyday Carry Essentials

      LEAVE A REPLY

      Your email address will not be published
      Required fields are indicated

      THE BELT AHOLSTER

      Product Review

      This is a great OWB Holster

      Product: The Belt Aholster

      Price: $84.97

      Durability: High

      Best Place To Buy This Product: www.aholster.com

      My Overall Rating: 9.0

      Quick Product Overview:

      If you like the conceal-ability of an inside the waistband (IWB) with the comfort of an outside traditional holster, you will like the Belt Aholster. Molded (bent) to conform to the curve of your hip and waist when worn in the 4 or 8 o’clock position. This helps to reduce printing and keeps the firearm and its grip tucked tight against the body. The weight of the firearm is carried evenly across your belt, unlike many traditional single point carry holsters, using 2 rubber adjustable straps (1.25″ to 1.75″.) The straps simply wrap around the holster and your belt and are snapped with the Pull-the-Dot (directional) safely snaps used on most military and police issued equipment. 

      Specifications Of This Product:

      • Right or Left handed.
      • 15% Rake.
      • Adjustable belt loops 1.25″ to 1.75″.
      • Adjustable retention.
      • Sweat guard.
      • Open bottom design.
      • Mag release is accessible while the firearm is holstered.
      • Molded to conform to the curve of your hip to reduce printing and keep the firearm tucked tight against your body. (Excellent for concealed carry.)

      What I Like About This Product:

      I have three of these holsters, one for my Glock 20, one for my Glock 30, and one for my Springfield Armory 1911 Ronin. With that being said you can see I really like them.

      This holster is extremely comfortable and very concealable for an OWB holster.  It really hugs my side so it pulls your handgun in tight. It holds my handguns very securely and stays in one place on my belt. My usual cover garment is an untucked long-sleeved shirt and that works fine. It does not “print” much at all. 

      What I Would Change About This Product:

      I have no changes to add to this product, it is great the way it is.

      Final Remarks:

      My usual holster is an IWB holster because I feel they conceal the best. But there are times when I do not want to wear an IWB holster and this is my “go-to” holster when that happens. The only thing is you need to wear a cover garment when wearing an OWB holster.

      I usually wear these in the Fall or Winter when wearing a cover garment is normal and does not stand out. But this is the only OWB holster I own and the only one I wear and I highly recommend these holsters.  So if you are looking for an OWB holster, you need to give these a try, you will not be sorry.  

      If you are interested in this product, click here.  Thanks for reading this product review.

      If you have any questions about this product review or anything else related to Everyday Carry (EDC)/Concealed Carry, feel free to leave a comment below and I will be happy to get back to you.

      Thanks,

      Larry

      Founder of Everyday Carry Essentials

        LEAVE A REPLY

        Your email address will not be published
        Required fields are indicated

        UNCLE HENRY PH1N PRO HUNTER & OLD TIMER SCHPHW-BRK PRO HUNTER

        Product Review

        Two Awesome Knives, same design, different handles

        Product: Uncle Henry PH1N Pro Hunter

        Price: $24.98

        Durability: High

        Best Place To Buy This Product: Amazon

        My Overall Rating: 9.0


        Product: Old Timer SCHPHW-BRK Pro Hunter

        Price: $36.00

        Durability: High

        Best Place To Buy This Product: Amazon

        My Overall Rating: 9.0

        Quick Product Overview:

        The Schrade Uncle Henry and Old Timer Pro Hunter knives feature a reliable satin-finished 7Cr17 stainless steel drop point blade. The drop point blade is ideal for general-purpose use with an easily controlled point, and a bigger belly blade design for rugged outdoor use while hunting or camping. Both Pro-Hunter knives feature a polished nickel silver bolster and an ergonomic finger groove for added security in your hand. These knives come outfitted with a brown leather belt sheath and lanyard strap to offer quick and easy access on your hip or storing safely in your hunting pack. The Uncle Henry Pro Hunter features an updated next-generation Staglon fitted handle while the Old Timer Pro Hunter features a Desert Iron Wood handle for the ultimate traditional look.

        Specifications Of This Product:

        Both Knives:

        • Overall Length: 8.125″
        • Blade Length: 3.625″
        • Cutting Edge: 3.50″
        • Blade Thickness: 0.13″
        • Blade Material: 7Cr17
        • Blade Style: Drop Point
        • Blade Grind: Hollow
        • Blade Finish: Satin
        • Edge Type: Plain
        • Handle Length: 4.50″
        • Handle Thickness: 0.70″
        • Guard Material: Nickel Silver
        • Weight: 7.50 oz.
        • Sheath: Brown Leather
        • Handle Material: Delrin (Uncle Henry)
        • Handle Material: Desert Iron Wood (Old Timer)
        • Handle Color: Brown, Tan

        What I Like About These Products:

        I have both of these knives and they are of excellent quality.  Both were extremely sharp right out of the box and so far they hold a good edge.  They both feel very good in your hand and do not create any hot spots. The leather sheaths are well-fitted and hold these knives very securely. Do they compare to a $100.00 knife, No! But for the money, you pay they are worth every cent. 

        What I Would Change About This Product:

        These knives are really nice and I like them a lot.  But the first thing I did was remove the lanyard straps on both of the knives. While those lanyards may work for some people, they do not work for me.  Other then that, no changes are needed.

        Final Remarks:

        I really enjoy both of these knives, I bought the Uncle Henry Pro Hunter for a general-purpose knife that I take to work on a daily basis.  The Old Timer on the other hand is really a pretty knife and I use it now and then. If you look at the design of these knives they are exactly the same, except for the materials used in the handles.  So if the like the design then you will like both of these knives. As I have mentioned in previous posts, I do not buy expensive knives because I tend to misplace them now and then or lend them out to others and they never get returned.  Therefore, finding good knives at reasonable prices makes good sense to me and serves me well.  I am not the type of person that needs to buy high-dollar equipment because there are always other things that warrant the extra money. I highly recommend either or both of these knives.

        If you are interested in these products, then click on the links below:

                                              Uncle Henry PH1N Pro Hunter

                                              Old Timer SCHPHW-BRK Pro Hunter

        If you are interested in similar products, click on the link below and it will take you to my EDC Fixed Blade Knives page, Thanks for reading this product review.

        Go To EDC Fixed Blade Knives.

        If you have any questions about this product review or anything else related to Everyday Carry (EDC)/Concealed Carry, feel free to leave a comment below and I will be happy to get back to you.

        Thanks,

        Larry

        Founder of Everyday Carry Essentials

          LEAVE A REPLY

          Your email address will not be published
          Required fields are indicated

          UNCLE HENRY 182UH ELK HUNTER KNIFE

          Product Review

          Very Nice Fixed Blade Knife

          Product: Uncle Henry 182UH Elk Hunter Knife

          Price: $31.99

          Durability: High

          Best Place To Buy This Product: Amazon

          My Overall Rating: 9.0

          Quick Product Overview:

          The Uncle Henry 182UH Elk Hunter Knife features a drop point blade that is ideal for general-purpose use with an easily controlled point and a bigger belly blade design for improved slicing strength.

          This knife features an updated next-generation Staglon handle fitted with nickel-silver bolsters and ergonomic finger grooves for added security in your hand

          It has a leather belt sheath that offers quick and easy access on your hip or safe and easy storage in your hunting pack.

          Specifications Of This Product:

          • The blade is made of reliable High Carbon Stainless Steel to withstand rugged outdoor use while hunting or camping.
          • 8.4 inch (21.34 cm) overall length.
          • Blade length of 3.8 inches (9.67 cm).
          • Weight of 6.3 ounces.

          What I Like About This Product:

          This is a very cool knife, the blade is very wide and sturdy. The handle has a unique look to it and feels very good in your hand.  The leather sheath is made very well and after some leather conditioning was added it is ready for use.

          What I Would Change About This Product:

          I was a bit disappointed with the edge of the knife, it was not very sharp out of the box.  But with a little work on my Work Sharp Knife and Tool Sharpener and my ceramic stone, it’s as sharp as can be.

          Final Remarks:

          I really like this Uncle Henry 182UH Elk Hunter knife, I bought it for my general-purpose farm knife and so far it has not disappointed me. It is not a fancy knife by any means but it is well-made and can take a beating. Once I got it sharp, it held a good edge and feels good in my hand.   A good knife is an essential EDC tool and this fixed-blade knife works great.  I highly recommend this knife as a great general-purpose knife.

          If you are interested in this product, click here.  If you are interested in similar products, click on the link below and it will take you to my EDC Backpack page, Thanks for reading this product review.

          Go To EDC Fixed Blade Knives.

          If you have any questions about this product review or anything else related to Everyday Carry (EDC)/Concealed Carry, feel free to leave a comment below and I will be happy to get back to you.

          Thanks,

          Larry

          Founder of Everyday Carry Essentials

            LEAVE A REPLY

            Your email address will not be published
            Required fields are indicated

            IMPERIAL SCHRADE IMP22 FOLDING POCKET KNIFE

            Product Review

            Handy Little Folder

            Product: Imperial Schrade IMP22 Folding Pocket Knife

            Price: $9.34

            Durability: High

            Best Place To Buy This Product: Amazon

            My Overall Rating: 9.0

            Quick Product Overview:

            The Imperial Schrade IMP22 Folding Pocket Knife hard-working knife that is lightweight and has a good feel in your hand. The smooth black celluloid handle is subtly curved to fit the contours of even a smaller hand while still providing the larger hand with an excellent tool.


            Specifications Of This Product:

            • 7Cr17 High Carbon Stainless Steel Drop Point Blade with Nail Pull
            • Black Celluloid Handle with Brass Pins and Heat Treated Back Springs
            • Blade Length: 2.7 inch (6.8 cm) Handle Length: 3.7 inch (9.4 cm)
            • Overall Length: 6.4 inch (16.2 cm) Weight: 0.12 pounds

            What I Like About This Product:

            This Imperial folder is very lightweight, opens and closes easily, and had an excellent edge on the blade. It is very small in size but still gets the job done.

            What I Would Change About This Product:

            At this point, I have no changes needed.

            Final Remarks:

            The Imperial Schrade IMP22 Folding Pocket Knife is really a great knife, I feel like I have stepped back in time to my boyhood days.  Small pocket knives were all I has as a youth but hated to be without one. This knife works great for small tasks and does it really well. As knives got more sophisticated, they grew larger and had more options on them.  But this knife has proven that simple works well too.

            I usually like a larger tactical folding knife with a locking blade but I thought I would try an old fashion pocket knife that takes minimal room in my pocket.  This knife is for my coveralls when I need a knife to cut baling string, and other small tasks, it works great!  It is very easy to open and close, and the blade is extremely sharp, right out of the box.

            If you are interested in this product, click here.  If you are interested in similar products, click on the link below and it will take you to my EDC Backpack page, Thanks for reading this product review.

            Go To EDC Folding Knives.

            If you have any questions about this product review or anything else related to Everyday Carry (EDC)/Concealed Carry, feel free to leave a comment below and I will be happy to get back to you.

            Thanks,

            Larry

            Founder of Everyday Carry Essentials

              LEAVE A REPLY

              Your email address will not be published
              Required fields are indicated

              ESSTAC SHOTGUN CARD

              Product Review

              The best Shotgun Card on the market

              Product: ESSTAC Shotgun Card 

              Price: 4-shell – $12.00

                           5-shell – $13.00

                           6-shell – $14.00

                           7-shell – $15.00

              Durability: Very High

              Best Place To Buy This Product: ESSTAC,  https://esstac.com/

              My Overall Rating: 9.0

              Quick Product Overview:

              This is a side saddle for your shotgun to hold extra shotgun shells where ever you want them. They can hold 4, 5, 6, or 7 shells. There is a hook velcro sewn on the back of the shotgun cards. They are made for 12 gauge shotgun shells only. If you need some Velcro, click on the “Add Sticky Back Loop Velcro for $1.50” and you will receive a strip of industrial-strength loop velcro with industrial-strength adhesive with your order. Choose this option if you would like to attach the shotgun card to your shotgun’s receiver. The shotgun cards come in Black, Coyote Brown, Ranger Green, Wolf, Olive Drab, and Multicam.

              Specifications Of This Product:

              Sizing:  6.5″ long x 2″wide

              Elastic: 1.5″wide

              Black,CoyoteBrown,RangerGreen,Foliage color is mil spec Elastic.

              Muliticam color is printed mil spec Elastic.

              ODGreen,WolfGrey color is commerical Elastic.

              What I Like About This Product:

              I have been in the market for some type of Side Saddle for my Mossberg 500 Shotgun.  There are many different manufacturers that make them but one thing they all have in common, is they are very thick.  For that reason, I decided to try shotgun cards.

              Here are my PROS for these ESSTAC shotgun cards: 

              1. These cards are much thinner then a traditional side saddle. 
              2. You do not have to modify the bolts on the shotgun’s receiver to hold them on. 
              3. They are held on using Velcro. 
              4. They come in 4, 5, 6, and 7 shotgun shell sizes. 
              5. They are easy to install. 
              6. They do not cover the serial number of my Mossberg 500 like the regular side saddles do.
              7. It is possible to remove an empty shotgun card and replace it with another full one.
              8. It is easy to preload the shotgun cards and have them in a bag or a pouch ready for use.
              9. If you decide you would rather not have the side saddle on your shotgun just peel it off and its gone.

              What I Would Change About This Product:

              I really like these shotgun cards and I have not found anything to change.

              Final Remarks:

              The ESSTAC Shotgun Card is an excellent product.  There are other places to order them from but I like going directly to the manufacturer.  Their customer service is excellent and they are great to deal with. The product is easy to install, and of the highest quality and the workmanship is great, it works great! I have a small messenger bag that contains 4 shotgun cards as my reserve ammo. I highly recommend this product!

              If you are interested in this product, click here. Thanks for reading this product review.

              If you have any questions about this product review or anything else related to Everyday Carry (EDC), feel free to leave a comment below and I will be happy to get back to you.

              Thanks,

              Larry

              Founder of Everyday Carry Essentials

                LEAVE A REPLY

                Your email address will not be published
                Required fields are indicated

                FYLAND TACTICAL FLASHLIGHT

                Product Review

                Nice tactical flashlight for the price

                Product: Fyland Tactical Flashlight

                Price: $29.99

                Durability: High

                Best Place To Buy This Product: Amazon

                My Overall Rating: 9.0

                Quick Product Overview:

                This Fyland Tactical flashlight is made of aviation-grade aluminum shell material, a strict antioxidant process, the lamp beads are made of high-quality material, is a very durable tactical flashlight, with an IP65 waterproof rating, please trust our quality, very high-cost tactical flashlight, will not let you down.

                This tactical flashlight has two switch modes, one is the ordinary button switch, and one is the tail-cap switch, which can be used in a variety of tactical equipment, the most cost-effective, and the best user experience.

                This flashlight produces CREE XPL V6 LED 1200 lumens tactical flashlight with ultra-long life span of 4 hours and maximum range of 200 meters, which can provide quality lighting conditions for outdoor activities and keep you out of the dark at night. This is a must-have tactical flashlight for anyone engaged in outdoor safety, outdoor travel, dark rescue, fishing, hunting, or camping in the wilderness.

                Specifications Of This Product:

                What I Like About This Product:

                This is a bright tactical light that works very easily. It comes with everything that you need: a flashlight with a button tail switch or tactical pressure switch, offset mount, and Allen wrench.

                I like the fact that it is an on-and-off button, no strobe or anything else to complicate things. The bracket works well and holds the flashlight tight.  I used BLUE Locktite when I put it together and so far things have not moved.


                What I Would Change About This Product:

                Everything that came with the flashlight works well, I do not know of anything that I would like to change.

                Final Remarks:

                The Fyland Tactical flashlight is a good flashlight that works really well.  I put it on my Mossberg 500 
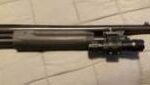
shotgun and it works well.  I decided not to use the tactical pressure switch as my thumb can turn it on or off the switch when it is handling the slide.  The only thing that I added was a Trinity Base Rail Mount 
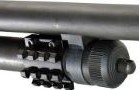
for my magazine tube. This was a great place to mount my flashlight and it is easy to get to but out of the way. I highly recommend this tactical flashlight for your shotgun, rifle, or AR-15.  

                If you are interested in this flashlight, click here.  If you are interested in the Trinity Rail mount, click here. If you are interested in similar products, click on the link below and it will take you to my EDC Flashlight page, Thanks for reading this product review.

                Go To EDC Flashlights.

                If you have any questions about this product review or anything else related to Everyday Carry (EDC), feel free to leave a comment below and I will be happy to get back to you.

                Thanks,

                Larry

                Founder of Everyday Carry Essentials

                  LEAVE A REPLY

                  Your email address will not be published
                  Required fields are indicated

                  Trimming the Forend Grip on a Mossberg 500 Field Model and Installing an Esstac Shotgun Card

                  I have a Mossberg 500 field/security combo, which means it comes with two barrels, a  28″ hunting barrel, an 18.5″ self-defense barrel, and a pistol grip.

                  It’s a great shotgun combination that works very well but there is a small modification that would make it even better.  I am making this change so that I can carry some additional shotgun shells on my shotgun receiver for either hunting or home defense. This article may seem a little out of place on this EDC/Concealed Carry website but it is definitely related.  

                  Why Trim The Forend Grip?

                  So the initial pandemic is over and things are getting back to normal.  Guns and ammo are beginning to return to the shelves at gun stores and that is a good thing if you are a gun enthusiast.  But what about parts for your guns?  I have been waiting for a new Mossberg forend slide assembly to become available so I can replace it on my shotgun and they are all on backorder.  No matter where I look online they are not available.  The reason I want a new assembly is so I can buy a different forend grip that will accommodate a 6-shot side saddle on my shotgun.  Unfortunately, the style forend that I have will not let me do this, it has small wings that overlap the receiver making it impossible to have a 6 or 7-shot card in place. 
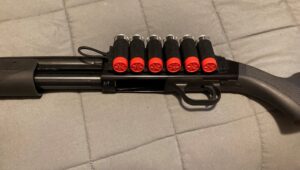
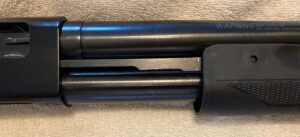
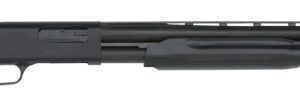
I can only put on a 4-shot side saddle on my receiver and that limits my extra shotgun shells capacity.

                  If I cannot buy a new action slide assembly then the only other thing to do is trim the rear portion of my forend grip to remove the wings so it will not overlap with the receiver and hit the side saddle.  I looked on YouTube for videos that explained this procedure but I could not find anything on that subject, so I had to use my best judgment in doing this project on my own.

                  Getting The Forend Grip Off Of The Shotgun

                  I looked at many videos on Youtube to understand how to remove the forend from the shotgun. Removing the forend grip is not difficult but does require a few steps.

                  • The first thing to do is make sure the shotgun is unloaded and move any loose ammunition away from your work area and to a secure location.
                  • Loosen the gun barrel nut until it is free from the end of the magazine and pull the barrel off, and set it aside.
                  • Push out the pin 
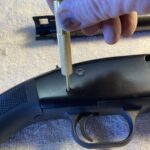
just above the trigger and place it in a dish or safe container so it does not get lost.  
                  • Pull the trigger assembly 
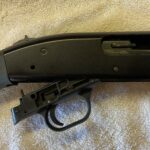
down and forward from the receiver and set it aside.
                  • When the trigger assembly is removed
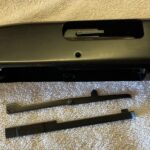
, two rails will become loose and they need to be set aside too.
                  • Place all the parts in a container 
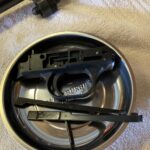
so they will not get lost.
                  • Lastly, align the tabs on the slide with the cuts in the receiver and pull out the bolt assembly, and set that aside as well.


                  • At this point, 
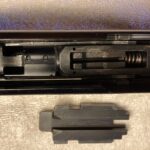
you can pull the forend grip out of the receiver and off of the magazine tube.

                  OK, The Forend Grip Is Off Of The  Shotgun, Now What?

                  In order to trim this forend grip, I used a reciprocating saw, bench disc sander, a single-cut file, an orbital sander, and some sheets of 100, 150 & 220 grit sandpaper
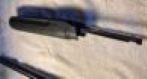
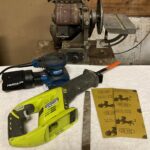
, as seen in the picture. My first choice would have been a bandsaw, but mine is out of commission right now.

                  I used blue painter’s tape to mark where I wanted to cut.  I used painter’s tape because it does not leave tape residue. Normally a sharpie would work to mark my cuts but they are difficult to see on the black surface.

                  When I used my reciprocating saw 
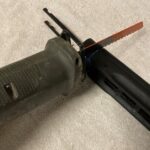
I had a metal cutting blade in it so the cut would be very smooth. As I cut the synthetic forend grip I cut very slowly so I could keep control of the saw so it would not over-cut the grip.

                  When I finished cutting I lightly touched up my cuts on the bench sander (100 grit), followed by the single-cut file, then with the orbital sander (150 grit).  Finally, I used some  220 grit sandpaper by hand to finish the job.  Each of those steps got my sawed edges smoother and more contoured. The last thing I did was take some gun oil on a cloth and buffed the edges.  This turned the whitish edges a darker black. At that point, I removed all the paper and blue painter’s tape and my finished product looked like this.

                  Then of course I had to put the forend back on my shotgun and got it back to working order, here is the completed job.

                  What Are The Advantages To Trimming The Forend Grip?

                  My first choice would have been to purchase a new action slide assembly so I could have selected a new forend grip of my choice, as there are many good ones on the market.  But since they were not available right now I thought this was the very best thing to do so I can set up my shotgun as I desire.  This alternative will work for now and if in the future I really feel a need to get a new forend grip, I can go that route.

                  Was Trimming The Forend Slide Worth The Trouble?

                  I feel this customization was a really good choice for me.  It saved me about $125 and was completed within 2 hours.  As you can see by the picture on the right
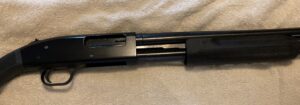
, it really turned out great and if you did not know I changed it you would not know anything was different. 

                  When I open the action, there is very little overlap on the receiver. This modification will let me add the Esstac 6-shot shotgun side saddle in a way that looks and functions well. If you have any questions about this procedure, feel free to leave comments below and I will get back to you. 

                  Look for a review on the Esstac shotgun cards in the near future.  If you find yourself in this situation I would highly recommend you try this method first and see if it works for you.  If not you can always go the more expensive way.

                  Now How Do You Install The Esstac Side Saddle?

                  Installing an Esstac Side Saddle is a very simple job, but must be planned out.  The side saddle goes on the left side of the receiver.  The only thing is that is where the serial number is located on a Mossberg 500, so we must not cover that number.  

                  The process of installing the shotgun card is as follows:

                  • Again make certain that your shotgun is unloaded and any shells are removed from your working area.
                  • The first thing to do is trim the piece of Velcro 
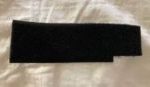
to fit your receiver so it will be easy to put on, making sure that the serial number is visible and not covered up by the Velcro.
                  • Then clean the receiver surface 
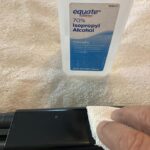
with alcohol to remove the dirt, oils, etc. that might cause the Velcro not to stick.
                  • Once the alcohol is dry you can remove the clear backing and put the Velcro in place
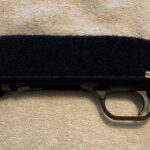
. Make sure you press all over the piece of Velcro so that the glue bonds to the receiver. (Leave it alone for a few hours so the glue sets well. It might be helpful to place a heavy book on top of the Velcro during those few hours).
                  • When the Velcro strip sets you are ready to place the shotgun card on your shotgun
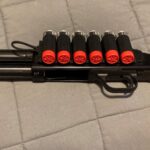
, I like to have the loop facing forward so I can pull it off in one clean motion after racking the slide, then replace it with a full one.

                  Final Comments

                  Making the decision to modify the forend of my Mossberg 500 worked out very well,  I was a bit nervous when I started but once I figured it all out things all came together perfectly. Do I wish I could have purchased a new style slide forend instead of trimming my old one, Maybe?  Only because there are so many new styles out there and it would have given my shotgun a new look and feel.   

                  Would I do it again?  Absolutely!  I saved myself some money and did it all myself which is a big plus.  I also learned how to disassemble and reassemble a Mossberg 500 which is a good thing.  I really enjoy doing things myself and making things turn out well.  For anyone out there that may be in the same place as I was, I would recommend trimming your forend first.  If you like it then stay with it.  If not then you can always buy a new one later.

                  As I said in the beginning, the subject matter of this article was a little outside the EDC parameters. But EDC is about being prepared for whatever comes along and being able to protect your family and yourself is about as important as it gets.  So if you choose to have a shotgun for home defense, then it must be set up in a way that works for the user and that is very important.  I chose to use a pump shotgun for home defense; therefore, this article was very relevant.

                  If you have any questions about this post or anything related to Everyday Carry (EDC) or Concealed Carry, feel free to leave a comment below and I will be happy to get back to you.

                  All the best,

                  Larry

                  Founder of Everyday Carry Essentials

                    LEAVE A REPLY

                    Your email address will not be published
                    Required fields are indicated

                    Gun Cleaning Kit, Buy One Or Make Your Own?

                    Most people have an idea what a gun cleaning kit is, but not everyone has used one. Whether you were exposed to it from your grandfather, when he taught you how to shoot or your dad doing the same thing during your youth. If you shoot a gun, whether it is a handgun or a rifle, you need to clean it when you are done.  So a gun cleaning kit is what you use to clean your guns after you shoot them. But my question to you is do you buy one from a gun store or do you put your own together? Lets explore that question.

                    Why Should You Clean Your Guns?

                    In order to define a gun cleaning kit, you need to understand why you need one. Almost all bullets, centerfire and rimfire are made of a lead core with some type of copper jacket surrounding it. Even lead-free ammunition contains copper. When a bullet is fired, residue from the bullet components are left behind in the barrel, chamber, and action and that process is called “fouling.” The four most common types of fouling are:

                    • Carbon, which occurs as a result of the burning powder that propels the bullet from the chamber through the barrel
                    • Copper, caused by copper-jacketed bullets leaving residue in the gun’s barrel after firing
                    • Lead, caused by lead bullets leaving residue in the gun’s barrel after firing
                    • Plastic, caused by the plastic wads from shot shells

                    It’s impossible to find ammunition that will not foul your gun. Black powder, most Berdan-primed, and a lot of military surplus ammunition is corrosive. This means there are salts in the ammo’s primer. These salts will damage your gun. If you shoot a gun using corrosive ammunition, you should clean it after each shooting session.

                    If you neglect your guns and there are moisture issue where they are kept (gun cabinets, closets, under your bed, etc.), such as high humidity then rust can be a problem too. Rust can cause severe damage, becoming corrosive and eating through the metal. It is even possible that parts can rust together. Rust can also affect the rifling in the gun barrel, causing pits to occur thus permanent damage.

                    Now that you understand how firing bullets and neglect of your firearms can leave residues that can damage your firearms, you should understand the need for a gun cleaning kit.  So a gun cleaning kit is made up of cleaning rods, swabs, patches, solvents and lubricants used to clean your guns in a way that removes all the dirt, oils and residues from your gun. Then it can be re-lubricated and ready for use.

                    What Is In A Gun Cleaning Kit?

                    Gun cleaning kits usually have many of the following items in the kit:
                    • Cleaning rods – A cleaning rod is what will move the bore brush and cotton patches through the inside of your gun during the cleaning process. There are one-piece carbon fiber cleaning rods and ones made out of brass or aluminum. These metal rods are in screw together sections.
                    • Bore brush – The inside of the barrel is called a bore and the brush used to clean the bore is a bore brush, they are caliber specific.
                    • Cleaning Jags – Every cleaning kit will come with some type of jag to hold the patches in place on the end of the cleaning rod. There are a couple of different types – slotted and form-fitting.
                    • Patches – Are usually made of cotton, round or square in shape.  
                    • Gun oils and lubricants
                    • Mops
                    • Cleaning patches (caliber specific, lint and fiber-free)
                    • Luster cloth/Silicone impregnated Gun and Reel Cloth
                    • Disposable gloves
                    • Double-ended/utility brushes
                    • Cleaning swab (optional)
                    • Bore snake (optional)
                    • Cleaning chemicals, including bore cleaners, action cleaners, 
                    • Disposable drip pan (to catch byproducts and residue of the cleaning process)(optional)
                    • Gun cleaning mats (optional)

                    There Are Many Gun Cleaning Kits Available.

                    There are many gun cleaning kits 
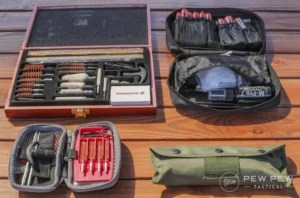
on the market today and here are a few that work very well:
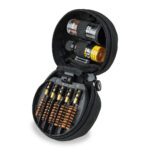
                    • Guardtech  Gun Cleaning Kit -This kit comes with almost everything you’ll ever need for shotguns, pistols, rifles, and even rimfire. It also comes with stainless, brass, and nylon brushes that I use for getting the gunk off hard-to-clean surfaces. You will need to get some extra patches, cleaning solution, and gun oil and your cleaning kit will be complete.
                    • M-Pro 7 Gun Cleaning Kit – This gun cleaning kit does have everything you need, including the oil and cleaner for your gun cleaning kit. The kit has individually packaged brushes and tips (.22 to 12-gauge) so you can keep everything organized and the case has more pouches to add additional cleaning items. It even comes with a silicone cloth to wipe down the surface of your guns. 
                    • Winchester 32-piece Universal Gun Cleaning Kit

                      This kit is a good deal for $30 since it is pretty universal…covering everything from .22 to 12 gauge shotgun. Two sets of brass rods won’t scratch your barrel’s harder steel and all the copper brushes are pretty good quality and marked with the caliber. It has a nice nylon case which keeps everything together. It comes with a small amount of patches, but you’ll need to add your own gun oil and gun cleaner to this kit.

                    • Real Avid Gun Boss Handgun Cleaning Kit

                      Now, do you only have a handgun right now, or want a super compact kit? The Real Avid kit is a great one for that. This kit covers everything from .22 to .45 caliber handguns. It’s tiny since the rods are long enough just for handgun-length barrels. It does not come with gun oil or cleaner…and you’ll be hard-pressed to fit anything in the box besides eye drop-sized droppers.

                    • Gloryfire Universal Gun Cleaning Kit  – It’s small, slim, and has an empty bottle to put some cleaner or oil. This makes a good range kiy, if you are doing minimal cleaning. Can’t go wrong with a backup cleaning kit for around $10.
                    • Hoppes Deluxe Gun Cleaning KitModel: 62108, This 62-piece cleaning kit contains everything you need to keep firearms spotlessly clean. Traditional Hoppe’s No. 9 Bore Cleaner, Lubricating Oil, and full-size brass rods and components keep pistols, rifles, and shotguns clean. All parts are contained in the durable, reusable locking tab carrying case.
                    •  
                    • Otis Tactical Cleaning System for Rifles, Pistols & Shotguns – For a little kit it is well-contained. It contains 100% cotton 2″ & 3″ patches (10 each), 3 slotted tips & 2 patch savers, Six firearm specific bronze bore brushes with size marked on brush stem (.22/.223, .270, .30/.308/30-06/30-30, .38/9mm, .45 cal, 12 ga),  8″ and 30″ aircraft grade Memory-Flex cables and thread connector for proper Breech-to-Muzzle cleaning. 34″ aircraft grade Memory-Flex cable (5-40 thread) with slotted tip is small enough to clean .17 caliber firearms,  Small & large obstruction removers knock out mud, snow & stuck casings. T-handle quickly attaches to the cable for added comfort. It also includes a chamber flag, 0.5 fl. oz. Shooter’s Choice FP-10 Lubricant Elite CLP & instruction manual and All items packed neatly in a 4″x4″x2.5″ soft pack case
                     

                    How Do You Make Your Own Gun Cleaning Kit?

                    This option would be for individuals who have been shooting for a while and are familiar with what is needed, not for the ones who are just getting started with firearms. 
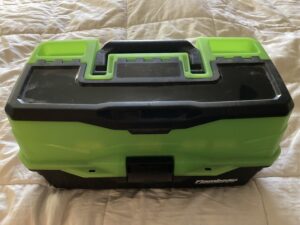
If you decided to build your gun cleaning kit from scratch, you would first need a container to hold everything.  My favorite is a fishing tackle box with three shelves, they have plenty of dividers to keep all your items separate and organized. Once you have your container picked out then you need to customize your kit how you would like it. I have collected a lot of cleaning supplies through the years so making my own was very easy. I added brass cleaning rods, brass jags, cleaning patches,  cleaning brushes (nylon and brass), Q-tips, pipe cleaners, cotton swabs,  Hoppes #9 solvent squeeze bottle, Hoppes elite gun cleaner, Break Free CLP, and some wash clothes. 
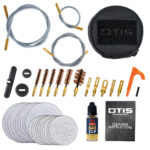
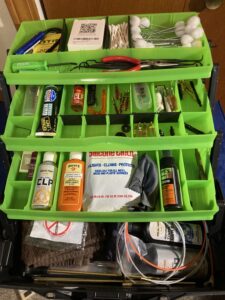
I have recently added a Otis Tactical Gun Cleaning System and it works great. I also added a bore scope, a 1911 front lug wrench, some small screwdrivers, needle nose pliers, a pick set (plastic), and some silicone rags. This is very mobile kit but I usually just use it at home for good gun cleaning.  The newest addition to my cleaning kit is a Otis Tactical Gun Cleaning System, it has everything necessary to clean rifles, shotguns  and pistols. It gives me the tools to always clean from the breech to the muzzle and that is the best way to clean. I just purchased a one piece cleaning rod to be used on very stubborn gun cleaning situations, these will not scratch your bore or crown when cleaning.  I also added a smaller version of the Otis Cleaning System to my MB Sxowbmu Handgun Tactical Range Backpack (See the review on March 24,2022) for quick cleaning at the range.

                    Final Comments

                    My recommendation would be if you are just starting out using guns, buy yourself a medium-priced cleaning kit.  This will help you decide what you like and dislike, what is necessary for cleaning and lubrication, and what is only useless stuff (not necessary). Then you can modify your cleaning kit to fit your needs.  Some people like the commercial gun cleaning kits and never feel a need to make their own, and that’s OK.

                    If you have been shooting for a while you may feel the need to make your own kit, and that’s fine too.  I hate the “junk” that some kits include in their kits, that’s what I call useless stuff.  So building your own gun cleaning kit is a way not to have that useless stuff and it only contains what you feel you need in a kit.

                    I am leaning toward the Otis Tactical Gun Cleaning System in my gun cleaning kit.  I like the cables and they cannot scratch your barrel or crown and they do a very good job cleaning your guns, plus you can clean anything that you have. This method lets you use the chemicals to do the work instead of you scrubbing your barrel.

                    So, the choice is yours, you do what you feel is right, there is no right or wrong answer.  I am here if you have questions; just leave a comment and I will answer your question.  Take care.

                    If you have any questions about this post or anything related to Everyday Carry (EDC), feel free to leave a comment below and I will be happy to get back to you.

                    All the best,

                    Larry

                    Founder of EDC Essentials

                      LEAVE A REPLY

                      Your email address will not be published
                      Required fields are indicated